Setup Wizard
AI development environment
AI Developer Environments
(for Designers)

TL;DR Set up your local development environment so you can vibe-code on your machine.
Ready to Build with AI?
If you want to go beyond online prompting and start working with more powerful options—like choosing your own AI tools or using new tech like MCP servers—you'll need to set up a development environment on your computer.
A development environment is the software on your computer where you write, run, and test code.
This guide will walk you through everything you need to get started. We'll install a few free tools and explain how each one helps. Here's a quick overview:
- Install VS Code: A powerful code editor where you’ll write and organize your code.
- Set Up Git & GitHub: Track changes, back up your work, and collaborate with others.
- Prepare Your Development Environment: Install essential tools that help your code run smoothly.
- Start a Project (with v0 and Cline): Use tools that help you build pages and apps with natural prompts and AI support.
- Share Your Work (GitHub + Vercel): Save your project online and publish it so others can see it.
New to this? No worries—we'll guide you through every step. By the end, your system will be ready to start building real projects with AI assistance.
AI Developer Environments
(for Designers)
TL;DR Set up your local development environment so you can vibe-code on your machine.
Ready to Build with AI?
If you want to go beyond online prompting and start working with more powerful options—like choosing your own AI tools or using new tech like MCP servers—you'll need to set up a development environment on your computer.
A development environment is the software on your computer where you write, run, and test code.
This guide will walk you through everything you need to get started. We'll install a few free tools and explain how each one helps. Here's a quick overview:
- Install VS Code: A powerful code editor where you’ll write and organize your code.
- Set Up Git & GitHub: Track changes, back up your work, and collaborate with others.
- Prepare Your Development Environment: Install essential tools that help your code run smoothly.
- Start a Project (with v0 and Cline): Use tools that help you build pages and apps with natural prompts and AI support.
- Share Your Work (GitHub + Vercel): Save your project online and publish it so others can see it.
New to this? No worries—we'll guide you through every step. By the end, your system will be ready to start building real projects with AI assistance.
VS Code (Visual Studio Code) is a free app for writing code and managing projects.
- You can write code and run your project to see updates in realtime.
- Later, We'll install the Cline extension that lets you "Vibe-code" with different AI models.
Version control for tracking and managing changes to project files
Git is a tool for version control that tracks changes to your project over time. It stores your files in a repository (repo). It lets you:
- •Save versions of your work (like snapshots)
- •Go back to earlier versions if needed
- •Work with others without overwriting each other's changes
- •Merge changes from multiple people
Think of it as a smart timeline for your project that you can rewind, branch off, or share.

Key Git concepts:
- • Commits are checkpoints with a unique ID and description
- • Branches let you work on features separately from the main project
- • HEAD is your current position in the repository
Github is the onlne home of your code
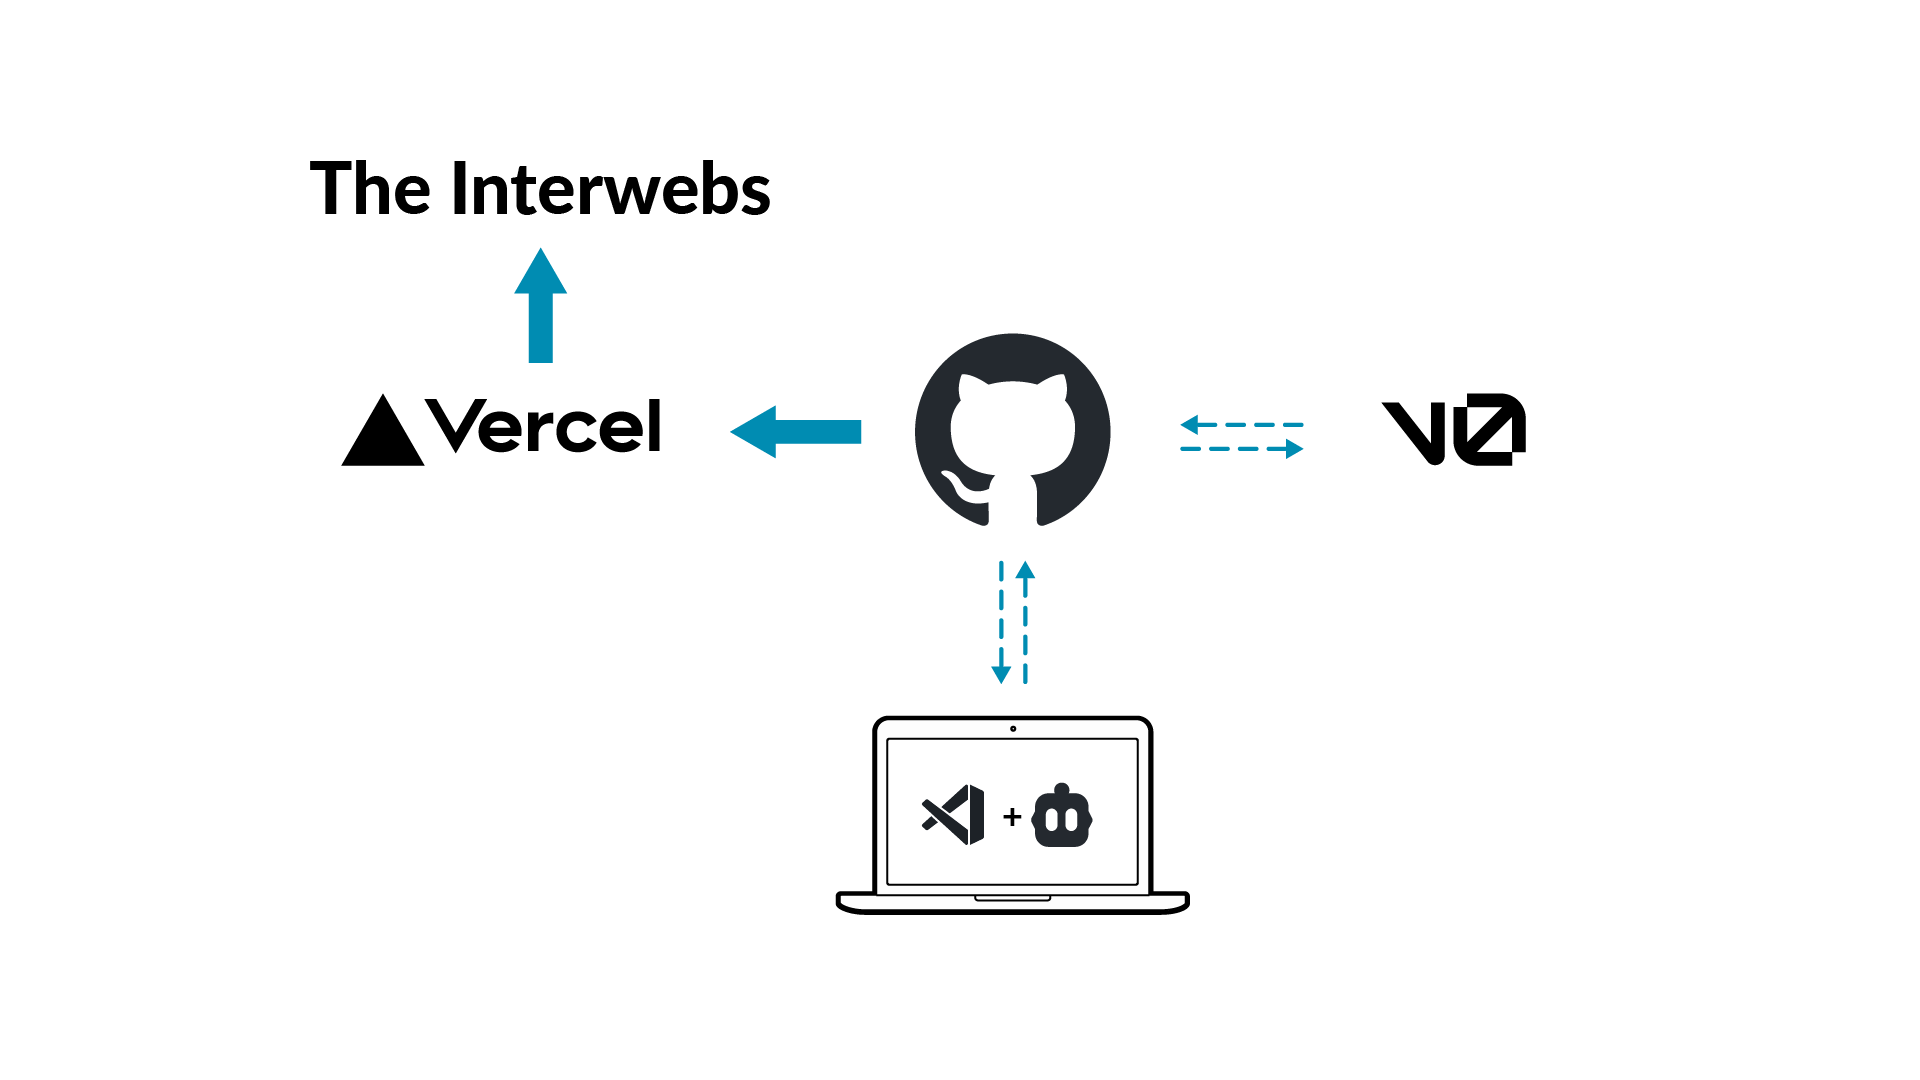
- Everything connects to your project through github:
- Your local work
- v0 for online vibe coding
- Other contributers and teammates
- Your application deployment (on vercel)
When you push changes to gitHub anyone connected to the repo can pull the latest version. We will set it up so that vercel watches the main branch and automatically updates your app.
This step walks you through setting up the software tools you'll need
You will need to enter your user password (which is not shown as you type), and press enter when prompted.
Open Terminal then run:
⌘-space and search for terminal
/bin/bash -c "$(curl -fsSL https://raw.githubusercontent.com/Homebrew/install/HEAD/install.sh)" && \
if grep -qxF 'eval "$(/opt/homebrew/bin/brew shellenv)"' ~/.zprofile; then
  echo "Homebrew already in environment, no change needed"
else
  echo 'eval "$(/opt/homebrew/bin/brew shellenv)"' >> ~/.zprofile
  echo "Adding Homebrew to environment"
fi && \
eval "$(/opt/homebrew/bin/brew shellenv)"
After installation, verify it works:
brew --version{
brew install git
brew install node
npm install -g pnpm
git --version
node -v
npm -v
pnpm -v
}Result
You'll have a working environment with:
- • Homebrew (manual)
- • Git
- • Node.js + npm
- • pnpm
Perfect for starting TypeScript apps!

If ~/.ssh/id_ed25519 already exists, do not overwrite it unless you're sure it is not being used.
Overwriting the key will break access to any services (like GitHub) that depend on it.
id_ed25519 is the default name, you can use any name you want. I use id_ed25519_keyname.
Enter the name for your new ssh key and email address. The terminal commands are updated to use those values. Use the copy button on the code areas to copy the commands and paste them as instructed.
The default is id_ed25519. I use id_ed25519_keyname
Open Terminal then run:
⌘-space and search for terminal
ssh-keygen -t ed25519 -f ~/.ssh/id_ed25519 -C "your_email@example.com"- • Press Enter to accept the default location:
~/.ssh/id_ed25519 - • Enter a secure passphrase when prompted (recommended)
ssh-add --apple-use-keychain ~/.ssh/id_ed25519This saves the passphrase in your login keychain, so you won't need to retype it after reboots.
Open your SSH config file in nano (a text editor for terminal):
nano ~/.ssh/configPaste in the following:
Host github.com
  HostName github.com
  User git
  IdentityFile ~/.ssh/id_ed25519
  UseKeychain yes
  AddKeysToAgent yes
Save and close the file.
Copy your public key to the clipboard:
pbcopy < ~/.ssh/id_ed25519.pubThen:
- 1. Go to GitHub SSH Keys Settings
- 2. Click New SSH key
- 3. Name it (e.g., "MyMacBook")
- 4. Paste the key
- 5. Click Add SSH key
ssh -T git@github.comExpected output:
Hi your_username! You've successfully authenticated, but GitHub does not provide shell access.You now have a secure, passphrase-protected SSH key integrated with your macOS Keychain and ready for GitHub.

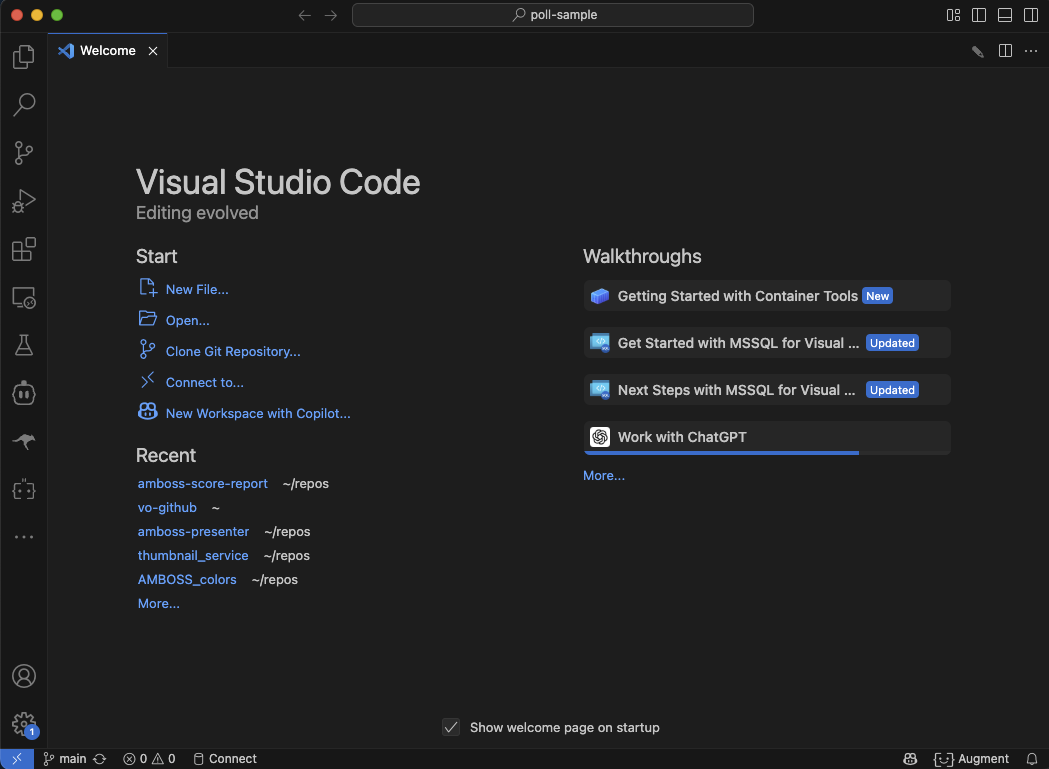
UI Basics (sidebar)

- Explorer - see the files in your project
- Search - find something in your project
- Source Control - your github link
- Run and Debug - never touched it
- Extensions - plugin tools
- Get the SSH URL for your repo from GitHub. Click Code → choose SSH then copy the URL.
- In VS Code: Press ⇧⌘P to open the command palette.
- Search for Git: Clone and select it.
- Paste the SSH URL for your repo, and choose a folder when prompted.
VS Code will use your SSH key setup to "clone" the repo.
Video Walkthrough
Packages are code libraries that your project uses. They are listed in the packages.json file and need to be installed for your project to run.
On the top right of VS code are layout controls that open and close UI panels. The third button opens the integrated terminal at the bottom of the screen.
To get the packages for your v0 project, run this command in the integrated terminal:
pnpm installThen, to start the application run:
pnpm run devThis will run the dev server and show link in the terminal for your app on localhost. As you make changes the app will automatically refresh to show them. Congratulations!
Video Walkthrough
Cline is an AI coding assistant for VS-Code that can analyze your project, create code, and execute commands for you. It lets you build software with natural prompts and approval over every change. It supports all major AI models and uses Model Context Protocol (MCP) to connect other services.

- Open Extensions (⌘⇧X) in the VS Code sidebar
- Search for Cline
- Click Install
Extensions are like apps for your code editor that add new features and functionality.
Video Walkthrough
- Open the command panel (⌘⇧P) and search for "Cline: Open in New Tab"
- In the new Cline tab, you'll see a prompt window and settings at the bottom
- Click the model name to choose your preferred AI provider
- Enter your API key and select a model
I like Sonnet 4.0 for most coding, Gemini for complex tasks with lots of context, and ChatGPT for advice.
Video Walkthrough
Plan Mode
Discuss the code and ask questions. Cline will make plans and provide suggestions but not do anything until you say "ACT"
'How might we', 'What is the container that has', 'I want to add a', 'explain the page structure to me', 'what component is the one that says'
Act Mode
Cline can make changes. Depending on your "Auto Approve" settings, they may pause to ask permission. I usually allow:
- • Read all files
- • Run safe commands
- • MCP Access
Be careful about letting it go wild with edit files. It will. If I have a clear plan and focus, I will sometimes let go of the reins, but you learn a lot by seeing the reasoning.
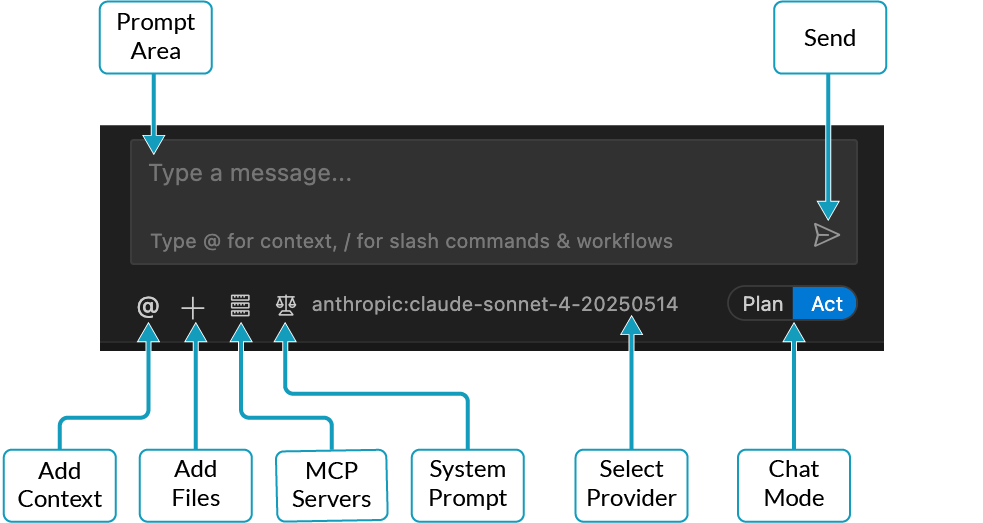
- Open the Cline tab in VS Code (if not already open)
- Type your request in the prompt area
- Choose between Plan (discuss) or Act (execute)
- Review Cline's suggestions and approve changes
- Watch as Cline reads files, writes code, and runs commands
Start with simple requests like "explain this code" or "add a button to this page" to get familiar with Cline.
Video Walkthrough
You're Ready to Vibe-Code!

- Stage - Collect your changes into a group to commit
- Commit - Save your changes with a message
- Push - Upload your commits to GitHub
To sync your project to GitHub from VS Code:
- Switch to Source Control
(your changes will be visible there) - Enter a commit message to describe your changes
- Click Commit to save the changes to your local repo
- Click Sync Changes to 'push' them to GitHub (the remote)
Now anyone connected to your repo on github can 'pull' the latest changes. Like your v0 project!
Video Walkthrough
Once your project is synced, v0 picks up the changes too.
- Return to v0
- Select your project
- The project updates automatically, and you can keep working with either method.
Video Walkthrough
One with the Cloud

Congratulations!
Your development environment is ready.

Enjoy building software with AI! Stay tuned for more tips and ideas.